
If you have used Windows 10 for a while, you might have noticed that the "old ways" of booting into Safe Mode no longer work. By that, we mean trying things like pressing the F8 or the Shift + F8 keys on your keyboard while booting. These methods stopped working because the start procedure became faster than ever before. However, that doesn't mean that Windows 10 has no Safe Mode. It's just that to get to it you have to follow other procedures. Let's take a closer look and see all the ways you can get into Safe Mode in Windows 10:

Safe Mode in Windows 10
When you enter Safe Mode in Windows 10, the operating system loads a minimal user interface, with only the essential services and drivers needed for it to function. Here’s how it looks:
1. Use the System Configuration tool (msconfig.exe)
One of the easiest methods to boot into Safe Mode in Windows 10 is to use the System Configuration tool. Many users know this tool by its executable name: msconfig.exe.
The fastest way to launch System Configuration in Windows 10 is to use the Run window. To do that, simultaneously press on the Windows + R keys on your keyboard. Then, write msconfig in the Open text field, and press Enter or OK.

Another way of opening the System Configuration Tool is to use Cortana. In the search field from your taskbar, enter the words ”system configuration.” Then click or tap on the System Configuration shortcut.

In the System Configuration window, click or tap the Boot tab. In the Boot options section, select the “Safe boot” option. Finally, click or tap on OK.

Windows 10 tells you that you need to reboot your PC for the new setting to take effect. If you still have work to do, you can select to “Exit without restart.” If not, you can restart now, and your device will automatically boot into Safe Mode.

After Windows 10 reboots, it goes straight into Safe Mode, where the first thing you’ll see is that Microsoft’s own Edge web browser doesn’t work. Fortunately, you can still use the old Internet Explorer.
2. Use the “Shift + Restart” combination
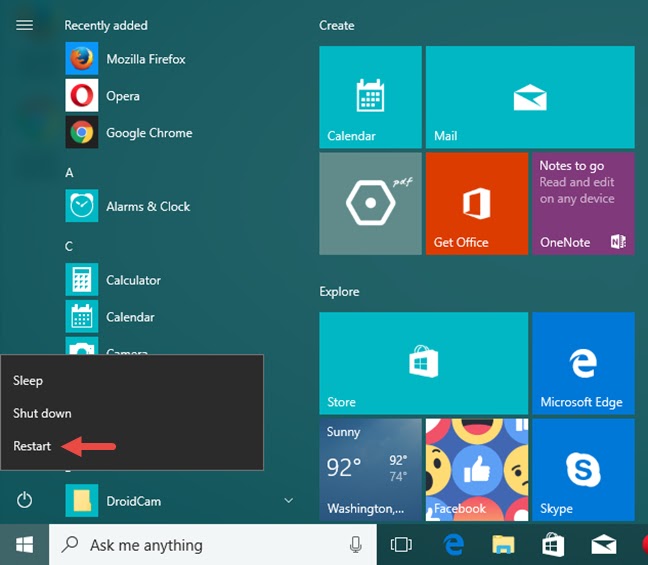
Another way of getting into Safe Mode in Windows 10 is to use the Shift + Restart combination. Open the Start menu and click or tap on the Power button.

Then, while keeping the Shift key pressed, click or tap on Restart.
Note that you can also use the Shift + Restart combination from the Sign In screen: click or tap Power, press and hold Shift and then click or tap Restart.

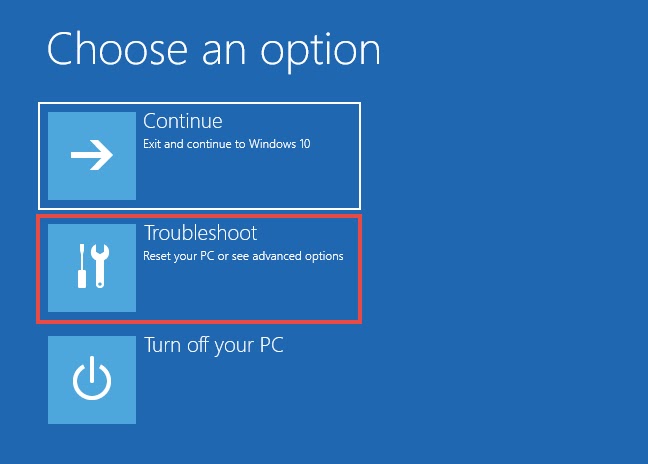
Then, Windows 10 reboots and asks you to select an option. Choose Troubleshoot.

Then, on the Troubleshoot screen, select Advanced options.

On the Advanced options screen, choose Startup Settings.

Windows 10 says that you can restart your device to change advanced boot options, including enabling Safe Mode. Press Restart.

After Windows 10 reboots, you can choose which boot options you want to be enabled. To get into Safe Mode, you have three different options.
To enable Safe Mode press the 4 or the F4 key on your keyboard, to enable “Safe Mode with Networking,” press 5 or F5, and to enable “Safe Mode with Command Prompt” press either 6 or F6.

3. Use the Settings app to access the Recovery options
To get into Safe Mode in Windows 10, you can also use the Recovery options available from the Settings app. Open Settings (Windows + I) and head to the Update & security section.

On the left side of the Settings window, press Recovery.

On the right side of the app, in the Advanced startup section, click or tap on the Restart now button.

After Windows 10 restarts, you’ll have to follow the same steps as those we’ve shown you in the second method from this guide. In short, you must go to “Troubleshoot -> Advanced options -> Startup Settings -> Restart”. Then, press 4 or F4 on your keyboard to start in Safe Mode, press 5 or F5 to boot into “Safe Mode with Networking,” or press 6 or F6 to go into “Safe Mode with Command Prompt.”
4. Boot from a recovery drive
In Windows 10 you can use the Recovery Drive app to create a system recovery USB drive. Once you have created a USB recovery drive, use it to boot your Windows 10 device and, when you're asked to load its content, do so.

The first screen asks you to choose the layout for your keyboard. Select the one you want to use, or if you don't see it listed, press on “See more keyboard layouts” to get the complete list of available layouts.

Once you’ve chosen your keyboard layout, on the “Choose an option” screen, select Troubleshoot.

The next steps you need to take to boot into Safe Mode are the same ones we showed in the second method from this guide, which is to follow this path: “Troubleshoot -> Advanced options -> Startup Settings -> Restart.” Then, press the 4 or the F4 key on your keyboard boot into minimal Safe Mode, press 5 or F5 to boot into “Safe Mode with Networking,” or press 6 or F6 to go into “Safe Mode with Command Prompt.”
5. Use a Windows 10 installation drive and the Command Prompt
If you have a Windows 10 installation DVD or USB memory stick lying around, or if you can create one right now, you can use it to boot your broken PC with Windows 10 into Safe Mode. To create a Windows 10 installation drive, follow the steps from this tutorial: How to download Windows 10 Creators Update and create your own installation media. Then use it to boot your broken Windows 10 PC from it and wait for the installation environment to load. Choose the language and keyboard layout you prefer and click or tap on Next.

Next, click or tap on the link that says “Repair your computer” on the bottom left corner of the screen.

Click or tap on Troubleshoot.
On the “Advanced options” screen, click/tap on “Command Prompt (Use the Command Prompt for advanced troubleshooting).”

Now Command prompt will load. Inside it, write the command: bcdedit /set {default} safeboot minimal. Then press Enter on your keyboard.
After a moment, Command Prompt tells you that “The operation [was] completed successfully.”

Then close the Command Prompt and choose to Continue on the next screen.

After your PC reboots, Windows 10 will automatically boot into Safe Mode.
6. Interrupt the normal boot process of your Windows 10 PC
If Windows 10 fails to boot normally three times over, the fourth time it enters by default in an Automatic Repair mode. Using this mode, you can boot into Safe Mode. To trigger the Automatic Repair mode, you must interrupt the normal boot process three consecutive times: use the reset or the power button on your Windows 10 PC to stop it during boot, before it finishes loading Windows 10. If you use the power button, you might have to keep it pressed for at least 4 seconds to force the power off. When your Windows 10 PC enters the Automatic Repair mode, the first thing you see is a screen that tells you that the operating system is “Preparing Automatic Repair.”

Wait for Windows 10 to try to make an automatic diagnosis of your PC.

Then, on the “Automatic Repair” screen, press the “Advanced options” button.

On the next screen, choose Troubleshoot.

From here on, the steps you’ll have to make are the same as those we’ve shown in the second method from this guide. Follow the path “Troubleshoot -> Advanced options -> Startup Settings -> Restart.” Then, press the 4 or the F4 key on your keyboard boot into minimal Safe Mode, press 5 or F5 to boot into “Safe Mode with Networking,” or press 6 or F6 to go into “Safe Mode with Command Prompt.”
7. Use F8 or Shift + F8 (doesn't work when using UEFI BIOS & SSDs)
In Windows 7, you were able to press F8 just before Windows got loaded, to open the Advanced Boot Options window, where you could choose to start Windows 7 in Safe Mode.
Some websites advise you to press Shift+F8, just before Windows 10 starts loading so that you make it launch the recovery mode, from where you can boot into Safe Mode. The problem is that most times, Shift+F8 and F8 doesn't work, even though they are correct commands, supported by Windows 10.
This official blog post from Microsoft (Designing for PCs that boot faster than ever before) explains that this behavior is caused by their work in creating a very fast boot procedure. Both Windows 8.1 and Windows 10 have the fastest boot times ever. To quote Steve Sinofsky:
“Windows 8 has a problem – it really can boot up too quickly. So quickly, in fact, that there is no longer time for anything to interrupt boot. When you turn on a Windows 8 PC, there's no longer long enough to detect keystrokes like F2 or F8, much less time to read a message such as “Press F2 for Setup.” For the first time in decades, you will no longer be able to interrupt boot and tell your PC to do anything different than what it was already expecting to do.”
If you have modern PC with a UEFI BIOS and a fast SSD drive, there's no way you can interrupt the boot procedure with your keypresses. On older PCs, with a classic BIOS and no SSD drive, pressing these keys might still work though.
Conclusion
Windows 10 is a fast operating system with a fast boot process. Getting into Safe Mode might not work the way it did in older Windows operating systems, but the methods available are similar to the ones in Windows 8.1. If you happen to know of other ways to do this, don't hesitate to let us know and we promise we’ll update this guide.
Are You Know?
Google Earth unveils new 3D features
OurMine YouTube Hack: Here’s How to Protect Your Account
YouTube TV Launches in Five Markets
How to boot into Windows 10's Safe Mode
Sometimes you have to boot into Windows' stripped-down Safe Mode. But with Windows 10, that gets complicated.
When you’re having issues with a Windows computer, one of the first steps to troubleshooting is to boot into Windows’ Safe Mode. Safe Mode is a simple, stripped-down version of the operating system, loading only the most essential files and drivers. It’s a way of eliminating as many variables as possible, and to ensure that the issue doesn’t originate at this most basic level. This is a great place to scan for malware, for instance.
But the old-fashioned way to get into Safe Mode—booting the PC and pressing F8 at the exact right moment—seldom works on PCs running Windows 10. These techniques will:
If you can successfully boot into Windows, booting into Safe Mode is relatively easy—if you know the trick.
Click or tap the Start button, and then the Power button. Hold down the Shift key when you select Restart.
In the resulting, full-screen menu, select Troubleshoot>Advanced options>Startup Settings.
In the Startup Settings screen, tap the Restart button. The PC will reboot, and bring you to a Startup Settings screen.
Use the arrow keys on your keyboard to select Enable Safe Mode or Enable Safe Mode with Networking.
But what if things are so bad that you can’t successfully boot the operating system?
Try booting anyway. If you can get to the login screen, you’ll find a power icon in the lower-right corner. The instructions above work there.
But what if you can’t get to the login screen? In that case, chances are that Windows is so messed up that it couldn’t boot into Safe Mode anyway. But here’s a trick that might work:
You’ll need a Windows 10 Recovery Drive, which hopefully you created while your PC was working. Boot the Recovery Drive and select your keyboard layout. Then select Troubleshoot > Advanced options > Command Prompt. At the command prompt, enter these three lines, making sure to hit Enter at the end of each one:
- c:
- bcdedit /set {default} bootmenupolicy legacy
- exit
Select Turn off your PC. Boot the computer and repeatedly press and release F8 until the Advanced Boot Options menu pops up. Then you can select Safe Mode or Safe Mode with Networking.
How to Force Windows to Restart in Safe Mode
There are a number of situations that could make it incredibly difficult to start Windows in Safe Mode. This is especially frustrating because whatever reason you have for needing to access Safe Mode is itself probably very frustrating!
For example, in Windows 10 and Windows 8, Safe Mode is accessed from Startup Settings, which itself is accessed from the Advanced Startup Options menu. Unfortunately, Startup Settings only appears as an option in Advanced Startup Options if you access it from within Windows.
In other words, Windows 10/8 needs to be working properly before you can boot into Safe Mode, which you only really need to use if Windows isn't working properly.
True, Advanced Startup Options (and thus Startup Settings and Safe Mode) do automatically appear during Windows startup problems, but the lack of easy from-outside-of-Windows access is a little troubling.
Windows 7 and Windows Vista have some less commonly occurring situations that make getting to Safe Mode nearly impossible, but they do happen.
Fortunately, there is a way to force Windows to start in Safe Mode if you can't get to Startup Settings in Windows 10 and 8, or the F8 menu (Advanced Boot Options) in Windows 7 and Vista, or even if you can't access Windows at all.
See How Do I Start Windows in Safe Mode? for the traditional method(s) of accessing Safe Mode.
Note: A kind of "reverse" of this trick also works to stop Windows from starting in Safe Mode.
If Windows continually boots directly to Safe Mode and you can't make it stop, take a look at the tutorial below and then follow the advice in How to Stop a Safe Mode Loop at the bottom of the page.
Time Required: Forcing Windows to restart in Safe Mode (or making it stop starting in Safe Mode) is moderately difficult and will probably take several minutes, at most.
How to Force Windows to Restart in Safe Mode
1. Open Advanced Startup Options in Windows 10 or Windows 8, assuming you're using one of those operating systems. Since you can't start Windows properly, use method 4, 5, or 6 outlined in that tutorial.
With Windows 7 or Windows Vista, start System Recovery Options using your installation media or a system repair disc. Unfortunately, this process doesn't work with Windows XP.
Note: If you want to force or stop Safe Mode from starting, and you actually can access Windows properly, you don't need to follow the procedure below. See the much easier How to Start Windows in Safe Mode Using System Configuration process.
2. Open Command Prompt.
Advanced Startup Options (Windows 10/8): Tap or click on Troubleshoot, then Advanced options, and finally Command Prompt.
System Recovery Options (Windows 7/Vista): Click on the Command Prompt shortcut.
3. With Command Prompt open, execute the correct bcdedit command as shown below based on which Safe Mode option you'd like to start:
Safe Mode:
bcdedit /set {default} safeboot minimalSafe Mode with Networking:
bcdedit /set {default} safeboot networkSafe Mode with Command Prompt:
bcdedit /set {default} safeboot minimalTips: Be sure to type whatever command you choose exactly as shown and then execute it using the Enter key. Spaces are very important! The { and } brackets are the ones above the [ and ] keys on your keyboard. Two separate commands are required to start Safe Mode with Command Prompt, so be sure to execute them both.
bcdedit /set {default} safebootalternateshell yes
4. A properly executed bcdedit command should return a "The operation completed successfully" message.
If you see "The parameter is incorrect", or "The set command specified is not valid", or "...is not recognized as an internal or external command...", or a similar message, check Step 3 again and make sure you executed the command properly.
6. Close the Command Prompt window.
In Windows 10 and 8, tap or click on Continue.
In Windows 7 and Vista, click the Restart button.
7. Wait while your computer or device restarts.
8. Once Windows starts, log in as you normally do and use Safe Mode however you were planning.
Important: Windows will continue to start in Safe Mode every time you reboot unless you undo what you did in Step 3. The easiest way to do that is not by executing more commands, but via System Configuration. See How to Start Windows in Safe Mode Using System Configuration and follow steps 8 through 11 in that tutorial.
How to Stop a Safe Mode Loop
If Windows is stuck in a sort of "Safe Mode Loop," preventing you from starting in normal mode again, and you've tried the instructions I gave in the Important call-out from Step 8 above but haven't been successful, try this:
1. Start Command Prompt from outside of Windows, the process outlined in Steps 1 and 2 above.
2. Once Command Prompt is open, execute this command:
bcdedit /deletevalue {default} safeboot3. Assuming it was successfully executed (see Step 4 above), restart your computer and Windows should then start normally.
0 Response to "How To Start Windows 10 in Safe Mode ( Full Step With Pictures )"